Saturday, September 29, 2012

Scrumptious Saturday-Rainbow Chili and Corn Casserole

Today has been a really productive day, and this evening has been even more productive in the kitchen!  I am currently waiting (impatiently) for the corn casserole to cook and for the chili to continue cooking, so I figured I would get writing while I wait.  Maybe it will keep my drooling to a minimum!  Doubtful, but worth a go, anyway...

Chili is one of my most favorite foods, and I look forward to Fall every year because it means it's finally cool enough to really enjoy it. I make chili a little bit different every time, so the name rainbow chili came to me as I was making it, and when you see my fresh ingredient photo below, you will see why!  

Corn Casserole is another big time favorite, but all the credit for this recipe goes to my friend, Jenn, who passed it along via another of my besties.  It is killer and a huge crowd pleaser.  I am always looking for an excuse to make it, and discovered last winter that it was delicious with chili!  

Alright, let's get cooking!  Chili takes longer to cook, so start it first.  You will need:


2 lbs of ground beef (I also use turkey often, but I had beef in the fridge, so I went with that.  Both are delicious.)
1 box of chili mix (I prefer 2 Alarm Chili, but really all you need if you don't want a box is chili powder, paprika, cumin, cayanne, salt, pepper, onion and garlic powder)
1 medium onion diced
1 clove garlic minced
I also added hot and spicy oregano, which I had growing in my garden
1 each zucchini and summer squash chopped
2 bell peppers, I have 4 in the picture, but only ended up using the orange and yellow ones-chopped
2 handfuls of frozen corn
1 serano or other hot pepper (this was in my garden, too) minced
1 can each diced tomatoes, tomato sauce, black beans, and kidney beans
1 packet of mesa (it your chili needs thickening

Ok, so get a big pot:
This is my new chili pot that I found on clearance today.  We'll see how she does on her maiden voyage!  Start with a little oil in the pan and soften up your onions and garlic before you add the ground meat. Salt and pepper each time you add something to the pot. Break it all up until your beef is browned nicely.  I use really low fat content, so I didn't need to drain, but if you have a lot of fat, drain it off.

 While the meat is browning, take this time to chop all of your veggies.  I love veggies in chili.  I think they add color, flavor, and texture.  Here is why I called it Rainbow Chili...  Isn't that pretty?!  Once everything is chopped, go ahead and throw everybody in the pot.  Stir it all up, salt and pepper, and then let them cook for a few minutes.  Last, throw in the corn, tomatoes, sauce, and a can of water.  Stir, and add all of your spices.  Leave the cayenne out if you don't like heat.  


Drain and rinse the beans.  I do this because you really don't need all of that starchy liquid, but also because I got a super cute new colander and wanted to try it out :)  Stir them into the pot, too, and then wait.  Chili is the kind of thing that gets better the longer it cooks, so use this time to make the corn casserole.  Put it over low heat, pop a lid on and let it simmer away!


Corn Casserole

Corn Casserole really needs its own page, so I'll hyperlink everything here from Scrumptious Saturday!  Like I said on the Chili post, this recipe is from my friend, Jenn, so I can't claim credit for it, but I also can't help but share it!  It is truly yummy.

Everything you need, plus cheddar cheese, which I forgot to grab because it doesn't get added till later.
 Here is what you need:


1 box of corn muffin mix (I like Jiffy)

1 16 oz. can corn kernels (drained)
1 16 oz. can creamed corn
1 stick of melted butter
1 egg
1 c. sour cream
1 c. cheddar cheese


Preheat the oven for 375.  Mix the corn, creamed corn, corn muffin mix, butter, egg and sour cream in a bowl.  Butter a casserole dish (or a square baking dish.) Pour the mixture in the buttered dish and bake for 45 minutes.  


After 45 minutes, take it out of the oven, stir in the cheese, and bake it for another 15 minutes.  Sometimes I sprinkle a little cheese on the top too :)
Stir in the cheese...
 
This is what it should look like coming out of the oven for the first time.
 
Sprinkle some cheese on top, and back in the oven!
  After 15 more minutes, take it out of the oven, and  get ready to dig in!


Friday, September 28, 2012

Menu Planning- Did I seriously just write that?!

Alright, so don't get too used to this, but I did something extraordinary today.  I planned out how many nights I would be home this coming week or so for dinner, and actually put some thought into what I wanted to make.  Seems like a pretty common thing for people to do, right?  Well, it's not something I'm accustomed to doing.  Usually I just wander the store and buy whatever looks delicious, but now that the weather is getting cooler, I am so motivated to be in the kitchen, that I thought some planning might be in order.   So I went through some old recipes and thought about trying some new ones who's ingredients overlapped a little bit, and I went to one of my favorite places....  Wegmans.
source of this photo

 If Trader Joes is where I go for all of my favorite cheats, prepared foods, and short cuts, Wegmans is where I go to satisfy my every food whim. I actually have made a ritual out of stopping at the cafe for a coffee (pumpkin latte today) and a cookie, and I slowly meander through the isles, just taking it all in.  I just don't understand my friends who hate grocery shopping!  What better way to spend a Friday after work, than unwinding in the produce section of your local Wegmans?  Alright, I'm getting a little carried away, but in all seriousness, this is fun for me.

Anyway, I had a wonderful time shopping, unpacked my groceries and am now settling in for a lovely, quiet weekend of cleaning, gardening, lawn mowing, some Dr. Who, and LOTS of cooking!  On the menu this week will hopefully be the following:
Chili
Corn Casserole
Chicken Tortilla Soup
Chicken and Spinach Flautas
Apple Bread Pudding
Caramel Sauce


Stay tuned for some awesome new recipes, my fruit/veggie bowl is overflowing!

Sunday, September 16, 2012

Chicken-Not-Pie

This may have been one of the first recipes that I created where I thought, "I should really start a food blog."  It's not beautiful to look at, or complicated to make.  It is delicious, easy, and comforting.  The first time I made this meal was for a cast party.  It was a chilly winter day and I was getting ready to host 25 hungry actors and production staff, and really all I wanted to have was a big chicken pot pie.  Now, since I was going to be at the theater up until a few minutes before everyone arrived, it dawned on me that I could call on my dear old friend, the crockpot.

We have been through a lot together, some good, some not so good, but on this particular day, she really came through for me.  Basically, what I did was think about what goes into a pot pie, throw it all together in the pot, and when I got home, I baked off some flaky biscuits and tada!!!  Deconstructed chicken pot pie, or as I've come to call it:  Chicken Not Pie.  It was a huge hit and the recipe has definitely made its way through my friend group.

Here's what you need:


1 small onion, diced
1-2 clove of garlic, minced (I left this out this time because I didn’t have any)
2-3carrots, cut up in bite sized pieces
2-3 pieces of celery (I like the ones on the inside with the leafy greens) cut to bite sized pieces
1 good sized russet potato cubed
3 boneless, skinless chicken breast, cut into bite sized pieces
salt, pepper, any fresh herbs you like-I used parsley this time, but rosemary, thyme, and sage have been yummy in the past
1 can each of cream of chicken soup and cream of celery (I used the low fat
of the chicken)
1 cup of frozen peas


Now really all you have to do is throw everything into the crockpot, except the peas, season with salt and pepper, mix it together and cook on high for 4-5 hours or low for 7-8.  When you pre-heat the oven for the biscuits,   toss the peas into the crockpot and stir them in.


Just before serving bake off some biscuits, I like the easy flaky ones in a can, but by all means, make homemade ones if you have the time!  Break a biscuit in half, put them in the bottom of a bowl, and pour the chicken "filling" on top, or do one half on the bottom and top it with the other half.


  Curl up with a good book, or invite a bunch of friends over and enjoy!  


I have to add that I've had a weekend of killer migraines, and it was so comforting to get this started today, crawl in bed with the kitties for a medicine induced nap, and then wake up to the delicious smell of Chicken Not Pie, bubbling away.  Perfect for a tough day with brain pain!

Wednesday, September 12, 2012

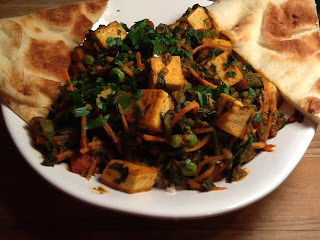
Another quick one... Tofu and veggies with curry sauce and rice

Today was my first day of school, and if you have ever spent even just a few hours with a 5 year old, you can begin to imagine how exhausted I am after 8 hours with 20 of them.  We had an awesome day, but seriously, I'm beat.  More than anything, my feet hurt and I didn't think I could stand (haha, stand) to be on my feet much longer.  So I went to my new favorite easy go-to meal.

So many of you may have gotten to the title of this blog entry and said, "Woa, tofu.  That's never gunna happen".  Well, I like it, and I could try and change your mind, but honestly, it's not worth the energy.  If you don't like it. Substitute chicken, or just eat the veggies!

 
 Alright, to get started, raid your fridge, freezer, and veggie bowl.  I found shredded carrots, parsley, frozen spinach, frozen peas, a pepper and a Roma tomato.  I've used many combinations of vegetables, just choose the ones you like, it's your dinner!

 I also grabbed my tofu, some box chicken stock, some frozen Trader Joes brown rice, and Trader Joes curry simmer sauce.  You may be starting to wonder if I'm working for TJs, but seriously, I'm not.  I just really like their prepared foods because they make my busy life easier.

Ok, get a medium skillet going over medium to medium high heat and add enough olive oil to go around the pan 2x.  While that is heating up, use a paper towel to absorb most of the water from the extra firm tofu brick,  then cube it into bite sized pieces.  Throw it in the oil and step back, the moisture may make it splatter. Season with salt and pepper, and if you like heat (I do) some red pepper flakes.  You can also microwave your rice now, three minutes and then it can just hang out and wait for the yummy goodness to join the party.

While the tofu cooks, chop any veggies that need chopping.  I did my pepper, tomato, and parsley.  Give your tofu a toss a few times every minute or so until it is golden brown in most sides.  Then add your vegetables.  Stir them around and give them a minute to warm up with their tofu friends.  Last, add half a jar of curry simmer sauce and about half a cup of stock to thin it out a bit.  I figured out today that if you are using the second half of the jar, add the chicken stock right in, fill it up, shake it and pour it into the pan.  Let it simmer until it reduces and gets thick.


While that's cooking, I love naan, so I take a piece and warm it in my toaster oven.  Most grocery stores have it packaged in the bakery section. 

Once the curry is nice and thick, but still saucy, stir in the parsley if you have some, and pour it over your rice.  (I added the picture of the rice because once you add all the good stuff, it's no longer visible, and I wanted to be sure that you knew it was under there!)  Add some naan and enjoy! 

This would feed two.  I thought I could eat it all, but barely ate half.  It's super filling and pretty healthy!  It's around 500 calories per serving, including the naan.

Saturday, September 8, 2012

Chocolate Croissants-Oh. Dear. God, are they amazing.

I should start out by sharing that I am not a baker.  I have only recently mastered box brownies, and that took years of practice.  Luckily for me, I have some amazing friends in my life who actually ENJOY the exact science and timing of baking.  I know, crazy, right?  


So, here is what happened.  In June, some of my friends and I went on a cruise.  It was really relaxing, fun, and really just a huge food fest.  When we returned to the cruel reality where there was no longer endless supplies of delicious food always at our disposal, there were definitely some withdrawal symptoms.  One thing that my two girls, Allie and Christine, and I particularly pined after were the chocolate croissants-pictured right.  After auditions for a show at our community theater, Barley Sheaf, the three of us were lamenting about how much we missed chocolate croissants warming in the tropical sun, getting gooey and warm, and how we wished we could make them here.  And luckily for us, we mentioned our craving in front of the right person.  Turns out, our friend, Jan, who is an incredible cook and baker, knew how to make said treats and was willing to teach us! 

The butter
The butter, after it had been smashed


A lovely day in September that turned from sunny to stormy set the scene as we rolled the day away.   Jan had pre-made the dough for us because it needed to rise.  The recipe came from Rose Barenbaum's cookbook, The Pie and Pastry Bible.  I may link that recipe eventually, but since it magically appeared for me, and I'm really tired, I'm going to leave it out for now.  If you are desperate for it, message me and I'll share!  He made enough for us to make 72 croissants and we did every step three times, so we got a lot of practice!  Our first step was pounding some butter.  Ok, more like a boat-load of butter...  I think it was a little over 3 lbs all together. 
S liked the butter pounding!
A 7.5" square of butter


Folding the butter
 After pounding the butter mixed with a little bit of flour, we used saran wrap to help contain the butter as we kneeded it, and then formed it into a 7.5" square.  This then went into the fridge and we made 2 more.

 After we stashed the butter squares in the fridge, we divided the dough that had been in the refrigerator over night into three equal parts.  We took the first portion and started rolling it out on a floured mat (with a built in ruler, bonus!)  We rolled it until it formed an 11" square.  


Once we had the dough in a square, we took the butter out of the fridge and while it was still wrapped up, we placed it diagonally on top of the dough, making a diamond in the middle.  
 
 We used a long, flat knife to mark the edges of the butter, and then removed the butter.
Once you take off the butter, use a rolling pin to roll out the corners and make them longer. 


Once it looks like the pictures above, kind of like a crazy star, we unwrapped the butter and put it back in the "butter square", spritzed the corners of the dough with water, and then folded them in to make a square butter package.


We then put this package in the fridge and repeated two more times.  Afterwards, we took the first one out again and rolled it out to be about 10"x22" rectangle. 


Once it was rolled out, we tri-folded it like a letter.  It was then wrapped up in saran wrap and put in the fridge. While this is cooling, cut up four bars of bittersweet chocolate.  We actually only had three and improvised with some dutch chocolate sprinkles for the last batch, but four probably would have done it. 
We cut these pieces in half one more time, too.
We did this to each butter package, and repeated the rolling and folding a total of four times each.  The dough then needs to rest in the refrigerator for 1-2 hours.  We could only wait for one, because, come on, this was taking all day and we really wanted to eat some chocolatey, buttery goodness.
 
  When you take it out, it will be all poofy.  The fourth roll should be a little bigger, about a 10"x24" rectangle.  We then cut the rectangle into a total of 24 squares.  The last assembly step was taking two small pieces of chocolate, placing them on the long edge of a piece of dough, and rolling them up, sealing the edge with a little spray of water.  They were then placed seam side down on parchment paper lined cookie sheets.  
 

      Finally, they are almost ready for the oven.  All you have to do now is brush them with an egg wash and then Jan's secret to not burning all of your hard work.  Spray them with a little water, and spray some in the oven as well!  Bake them for 10 minutes at 390 degrees, then switch the top and bottom pans and checking them every 5 minutes thereafter.  If you have an internal thermometer, it should reach around 205 degrees.  
 
 When you take them out of the oven, and God, do they smell divine, cool them on a baking rack until you can't stand it anymore.  Then enjoy the flaky, buttery, chocolate perfection.
They may be one of the best things I have ever tasted.  Baking all day with your friends is awesome, but when you create something so incredibly delicious, well, there aren't many things better.  I conquered my fear of baking, all with the help of some wonderful friends.  Good luck if you tackle these, bring along some friends, some snacks, and enjoy!