No, seriously. Start with good bread, I like sourdough or Italian. Slice it, butter it with real butter, top it with thinly sliced radishes, and finish it with a sprinkle of sea or kosher salt. Trust me, this may be one of the best snacks you'll ever eat! As a matter of fact, I may go have to pull some out of my garden right now because my mouth is watering just writing about it.
I am just a laid back Kindergarten teacher who loves to cook. I started this blog because I have so much fun in the kitchen, and since I usually just cook for myself, this seemed like a great way to share it all! Look for quick, easy recipes, and some meals you will want to make over and over again. I usually cook for one, so this is also great for singles or couples!
Friday, May 17, 2013
What can I do with radishes, you ask?
Sunday, March 31, 2013
Eggs Benedict
I was feeling adventurous today, so I decided to tackle one of my favorite breakfast foods, eggs benedict. I actually wanted to do florentine, but my mom had the spinach and decided not to come over for breakfast this morning, so here it is, simplified. And, actually, I was stressed out enough without worrying about the spinach.
I feel like making eggs benedict was sort of like making caramel for the first time. Once you get a feel for it, it's pretty simple and straight forward, but the first time through, the unknown can be intimidating!
So, I made this for one, but the sauce makes enough for two or three, so if you are making it for two or more, just make more eggs, meat, and english muffins.
You will need for the Hollandaise sauce:
2 egg yolks
a pinch of salt
1 Tbsp water
4 Tbsp softened butter
1 Tsp lemon juice
1 pinch cayenne pepper (optional)
For the rest of the dish you will need:
1 toasted English muffin per person
2 slices of pork roll (I prefer this over Canadian bacon, but it's your call)
butter, if you are using Canadian bacon- none if you use pork roll
2 eggs per person
1 Tbsp white vinegar per two eggs
Salt
Fresh chopped parsley for garnish
I cooked the components, one at a time. I was worried about timing, but having done it once, I feel like there were things I could do next time to coordinate the timing better. I'm going to blog what I did, and let you be the judge about timing. I started with the sauce, because I was most worried about it. Before I began, I had everything else ready to go; the english muffin was split and sitting in the toaster ready to be toasted, the pork roll was cut and ready to be heated through in the pan, and the water and vinegar were in the pot, ready to be heated up.
Start the sauce by separating two eggs, and add them, the Tbsp of water, and a pinch of salt to a small sauce pan. Heat them over REALLY low, gentle heat and start whisking.
Keep whisking until your sauce gets foamy and thickens up. If it starts to curdle, don't panic, just take it off the heat and keep whisking.
Once it is thick and foamy, like the picture to the right, take it off the heat, and whisk in the butter a few tablespoons at a time.
Once that is all incorporated, add in the lemon juice and set it aside. I made the mistake of putting my sauce on really low heat until I was done everything else and it thickened up more than I wanted. I would suggest just leaving it be, or maybe putting it in a bowl over a pot of steamy water so it stays warm gently. If you let it get too thick, like I did, I thinned it out with a little water and a little more lemon juice and did a lot of whisking. It was still delicious!
So, now get your water (about an inch deep) and vinegar boiling for the poached eggs. Once it is bowling, lower the heat back to a gentle simmer. Crack one egg at a time into a small bowl, and carefully slide them into the water. Don't crowd the pot, just do two at a time. Let them cook gently for about 3-4 minutes. It's not a very pretty process, but it works. Sorry I didn't get a picture of it!
I feel like making eggs benedict was sort of like making caramel for the first time. Once you get a feel for it, it's pretty simple and straight forward, but the first time through, the unknown can be intimidating!
So, I made this for one, but the sauce makes enough for two or three, so if you are making it for two or more, just make more eggs, meat, and english muffins.
You will need for the Hollandaise sauce:
2 egg yolks
a pinch of salt
1 Tbsp water
4 Tbsp softened butter
1 Tsp lemon juice
1 pinch cayenne pepper (optional)
For the rest of the dish you will need:
1 toasted English muffin per person
2 slices of pork roll (I prefer this over Canadian bacon, but it's your call)
butter, if you are using Canadian bacon- none if you use pork roll
2 eggs per person
1 Tbsp white vinegar per two eggs
Salt
Fresh chopped parsley for garnish
I cooked the components, one at a time. I was worried about timing, but having done it once, I feel like there were things I could do next time to coordinate the timing better. I'm going to blog what I did, and let you be the judge about timing. I started with the sauce, because I was most worried about it. Before I began, I had everything else ready to go; the english muffin was split and sitting in the toaster ready to be toasted, the pork roll was cut and ready to be heated through in the pan, and the water and vinegar were in the pot, ready to be heated up.
Start the sauce by separating two eggs, and add them, the Tbsp of water, and a pinch of salt to a small sauce pan. Heat them over REALLY low, gentle heat and start whisking. Keep whisking until your sauce gets foamy and thickens up. If it starts to curdle, don't panic, just take it off the heat and keep whisking.

Once it is thick and foamy, like the picture to the right, take it off the heat, and whisk in the butter a few tablespoons at a time.
Once that is all incorporated, add in the lemon juice and set it aside. I made the mistake of putting my sauce on really low heat until I was done everything else and it thickened up more than I wanted. I would suggest just leaving it be, or maybe putting it in a bowl over a pot of steamy water so it stays warm gently. If you let it get too thick, like I did, I thinned it out with a little water and a little more lemon juice and did a lot of whisking. It was still delicious!
So, now get your water (about an inch deep) and vinegar boiling for the poached eggs. Once it is bowling, lower the heat back to a gentle simmer. Crack one egg at a time into a small bowl, and carefully slide them into the water. Don't crowd the pot, just do two at a time. Let them cook gently for about 3-4 minutes. It's not a very pretty process, but it works. Sorry I didn't get a picture of it!
Once you drop your eggs, go ahead and heat your meat through in a frying pan. Use butter if you are using Canadian bacon because it's low in fat, pork roll has plenty of it's own, and doesn't need it. Give them about a minute or 2 on each side and then turn off the heat. You can also toast your English muffin at this point. Use a slotted spoon to remove your eggs.
Once your whites are white, you can go ahead and plate. Start with the muffin, then layer the meat, then your poached eggs, top with the Hollandaise sauce, and garnish with a little cayenne pepper and chopped parsley.
Homemade chicken dumplings and ginger scallion sauce
Happy Easter, all! My family isn't big on celebrating Easter, but since I've been on vacation I've been cooking things that I normally wouldn't tackle (like making my own dumplings!) I will be honest and say that this took longer than I expected, mostly because I think I was a slow wrapper and made a lot of dumplings, but honestly, if you have some time, these are really yummy, and as I told my friend Allie, it's nice to know what's in your food!
So, the recipe I used was from my favorite cooking app, How to Cook Everything by Mark Bittman. It was given to me by my dear friends, Adam and Jen, and it is amazing.
Below is pictured pretty much everything you need; a little of a lot of things! This recipe made around 24 dumplings for me. You will need:
1/2 lb ground chicken (or pork, or whatever you want to use)
1/4 c minced scallion
1 c washed and chopped leeks (I have a suggestion for washing, see below)
1 Tsp minced fresh ginger
1 Tsp rice wine
1 Tsp sugar
1 Tbsp soy sauce (I use low sodium)
1 Tbsp sesame oil
1 egg, lightly beaten
large pinch of salt
about 24 dumpling skins (I used square wonton wrappers because it was what I could find)
Peanut oil for cooking
For the Ginger-Scallion Sauce:
1/4 c minced fresh ginger
1/2 c chopped scallion
1 clove garlic, minced
1 Tsp salt
1/2 c peanut oil
So, about those leeks. They are best cleaned AFTER you cut them up because they get a lot of sand and grit in between the layers. I like to fill my salad spinner with water, separate all the rings, swish them around in the water, and then pour out the water, and give the a spin. I then cut them up into a smaller dice.
Alright, so now combine your first 11 ingredients in a bowl for your filling.
So, flour your surface put down a wrapper and place about a teaspoon of filling into the middle of the wrapper. Have a small bowl of water nearby, and use your finger to wet all four edges of the wrapper. This will act as the glue to hold it together.
Next, find a way to fold them up. I folded corner to corner, and then kind of pinched other corners up and in to make sort of a pleat to make them more interesting. I don't think it matters how you fold them, as long as they are completely sealed, and you don't leave a lot of air space around the filling inside.
I think these look kind of like little boats :)
Here they are, all finished! I only cooked a few, and I made sure the others had a little flour on them, and put them in the fridge for another day. I have a feeling they will soon end up in the freezer though, because I am still eating pork and spinach from the other night!
Ok, so now it's time to cook the dumplings and make the sauce. Take a large skillet with a lid, and heat a light coating of peanut oil over medium high heat. When your pan gets hot, put in your dumplings, seam side up and let the bottoms brown for about 3 minutes. Then, add 1/2 a cup of water, pour it in carefully cause the oil will spatter, and put the lid on to catch all the steam. While these cook for like 3 minutes, get your sauce ready. If there is any water left in the pan, after 3 minutes, take the lid off and let the water cook off.
The sauce was easy and pretty fun and exciting to make! I rough chopped the ginger, scallions and garlic, and minced them in my mini food processor. (It's still one of my favorite kitchen tools!) Then put the chopped stuff in a heat safe bowl. Heat your 1/2 cup of peanut oil in a small saucepan over high heat until it starts to smoke. Then comes the exciting part! Carefully, pour the hot oil into the bowl of veggies. They are going to spit and sizzle because the hot oil is cooking the veggies, and they are full of moisture. I didn't get burnt, but be careful! Then stir it all together and you have your yummy sauce. Oh, I also added some Sriracha to the sauce for heat!
I finished the dish with some brown rice, topped it with the dumplings, and the ginger-scallion sauce. It's pictured below in my special rice bowl, made by my friend Jess. YUM!
Thursday, March 28, 2013
Pork and spinach stir fry
This is absolutely one of my new favorite meals. It is quick, healthy, and delicious, and I'm not ever a big pork fan. Actually, you could probably do it with chicken, too... Anyway, as I was driving home from my first Zumba class (starving, of course) I was trying to figure out what I could make that was fast and wouldn't undo all of my hard work. Pork and spinach was the winner.
There is very little prep work, but I suggest having everything ready, including the rice when you start cooking because this one goes fast!
For 2 servings you will need:
2-4 Tbsp peanut (or other neutral oil)
2 boneless pork chops- sliced small and thin
2 cloves of minced garlic
1 Lb spinach
2 Tbsp soy sauce
Juice of 1 lime
Chopped scallion for garnish
Brown rice (I like Trader Joes frozen bags- they are so good and quick)
Salt and pepper
Heat half the oil in a large skillet over medium to medium/high heat, season, then add the pork to the pan. Cook until the pink is gone and you have some nice color on the outside, about 3 minutes.

Once it's cooked through, remove it and set the pork aside. Add the rest of the oil, turn down the heat to medium, and toss in the garlic. Then add the spinach. It will cook down quickly, so just keep tossing it and adding it until it is all cooked down.
Then put the pork back in, and add the soy sauce and lime juice to the pan, stir it all together.
Plate the pork and spinach on a bed of rice, and top with some chopped scallion. Sorry the finished product picture isn't the best, but I was too hungry to wait to take another one. You are just going to have to try and see how it looks for yourself!
Sunday, February 3, 2013
Quick and tasty green beans
Yesterday we had our One-Act Play Festival at Barley Sheaf Players. This is one of my favorite theater events of the year. I love the full range of performances, the support and companionship, and all the thoughtful feedback. They make for a real "feel good" kind of morning. It has become tradition for many of us to get together and have brunch afterwards, and today that led to an impromptu potluck gathering at the Robinsons. Time was limited and my fridge was empty, so I had to think, and cook, quickly!
I decided to make garlic and shallot green beans. They are super easy, and it meant that all I needed at the store was green beans, because for some reason, even when I don't have milk, or eggs in the fridge, I somehow always have garlic and shallots in the veggie bowl on my counter.
So, you start by trimming your beans, or by buying them fresh but already trimmed. Get a large pot of lightly salted water boiling. Once it's got a rolling boil going, throw in your beans. Let them boil for about 2 minutes, then drain them, and shock them with ice water. I usually just throw ice on top of them and add some cold water right to their pot after I have poured off the cooking water. This saves me cleaning a dish, which I like :)While your beans are chilling out, either dice or throw 2-3 shallots and 3ish cloves of garlic into a mini food processor (have I mentioned I love mine?!)
Heat a little olive oil and a touch of butter in a large skillet over medium. Once it is hot, saute the shallots and garlic for just a few minutes, and go ahead and drain your beans again. I love shocking because they will be so green!
Toss in your green beans and mix everything together. At this point, I like to add salt, pepper, and a shake of red pepper flakes for just a little hint of heat.
The last thing I did was make some parmesan cheese crisps. These are really simple. I pre-heat the oven to around 375-400. Line a cookie sheet with parchment paper and then just grate little piles of cheese onto the paper. Heat them for just a few minutes, and take them out before they get brown (I find when they cook too long they get bitter.) Let them cool for just a minute and then use a metal spatula to carefully slide them off the paper and onto the top of your green beans in a serving dish.
These were a great addition to Allie's Mac and Cheese and our other tasty treats. Give them a try!
Friday, January 18, 2013
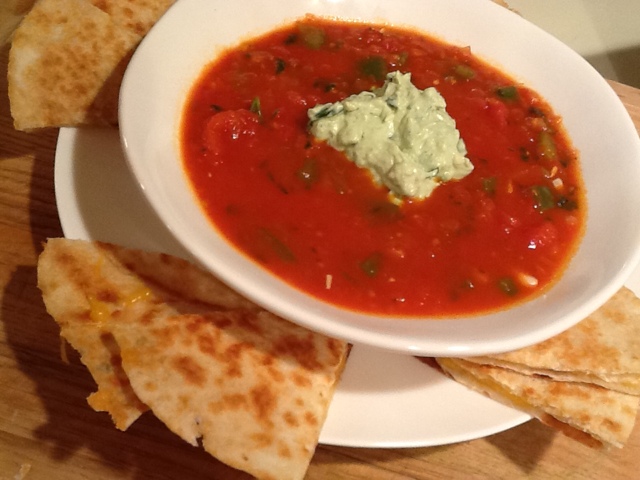
Salsa Soup and Cheese Quesadillas
I have to start this post by giving credit to Rachel Ray for coming up with the base for this recipe. I only alter it a little, so I definitely can't take credit for it. I do, however love how flavorful, healthy, easy, and quick it is to make!
I started by chopping a large green bell pepper, and get a large pot heated over medium heat with a few trips around the bottom with olive oil. Throw in your pepper, and then I used my mini food processor to chop two shallots, three cloves of garlic, two jalapeno peppers, and a small onion. If you don't have a little food processor, by all means, chop away, but I hate crying through onions, and smelling like garlic, and I inevitably touch my eyes after peppers, so I am loving my newest kitchen toy! Also, I usually leave my veggies pretty chunky in this, but I don't love biting into a big chunk of any of those, so I dice them pretty small, more for flavor than texture. Throw those all in the pot and season them with salt and pepper.
Let those cook for a few minutes and then add two cans of tomatoes, one crushed, and one stewed. Top this off with some chicken stock to thin it out. I use about a cup and a half, but thin it to the consistency you like, I prefer thicker soups. Let this bubble away while you make your quesadillas. Before you serve the soup, stir in a handful of freshly chopped parsley.
I use flour tortillas, but you could use whole wheat. They were just what I had on hand. I also had shredded sharp cheddar, and a block of pepper jack, or something spicy, I forget what exactly it was, but use your favorite melting cheese! You can make them in oven, like 10 minutes on 300 degrees, but I like to make mine in a pan on the stove. (You will find, if you follow my blog, that I rarely use the oven. I think it goes back to some control issues, but who really knows!) So, I spray a pan with non-stick spray, put a tortilla down, cover it with cheese, top it with the other one, and cook it over medium heat until it is golden brown and the cheese is melty, then flip and repeat.
Ok, the last thing I added was a mix of half an avocado, two spoonfuls of sour cream, a little lemon juice, some fresh parsley, and a pinch of salt. I spoon a dollop on my soup, and it adds a refreshing coolness to a more acidic, spicy soup. Yum.
Ingredients list:
olive oil
1 bell pepper
2 jalapenos
3 cloves garlic
2 shallots
1 small onion
1 28 oz. can crushed tomatoes
1 28 oz can stewed tomatoes
1.5 cups chicken stock (ps. Use veggie stock to make it vegetarian)
chopped parsley
flour tortillas, 2 per person
2 cups shredded cheese
sour cream
.5 avocado
lemon juice
salt and pepper
Tuesday, January 8, 2013
Sweet potato and white bean burger
Ok, I'm starting by saying, you will love this "burger." You may be thinking, "I don't like sweet potato!" or "Beans, yuck!" but seriously, this is so. good. I got the base for my recipe from another blog I stumbled upon on Pinterest, but it made way too many and I made a few changes so below was my first go at these and there are only a few changes I would make, so I'll note them as I go :)
Before I even start, this got messy. I have very few pictures of the process because I was a mess. There was sweet potato everywhere, I used half the tools in my kitchen, and definitely got to a point where I was asking, "What have I gotten myself into?!" But I learned a lot tonight, and I will pass along my new found wisdom, which should keep your kitchen, hands, and life a little neater, at least for this meal.
So, first you need to cook a sweet potato. I did this by piercing the skin and roasting it at 375 for like 25 minutes. Next time I will poke it and microwave it for sure. Next, you need to drain and rinse a can of white beans. Now, my first mistake was thinking, I should totally use my mini food processor! (Mostly because I thought it would be faster, but also because it's my newest kitchen toy and I wanted to use it) but I will tell you that it wasn't going to give me the texture I wanted, so halfway through the processing, I took it out, transferred it to a bowl, and mashed it with my potato masher. (Mess #1) So, take my advice, and just use a bowl and a masher.
Once the sweet potato is cooked, you can put your beans and the potato (not the skin) into a bowl, add an egg, about 4 tbsp of wheat flour, salt, pepper, and I used cajun seasoning. I wish I had used more salt and more seasoning. I think you could use whatever seasoning you like, I thought about lemon pepper, but thought the little spice and heat would balance the sweetness of the sweet potato. (It did!) Ok, so mash all of that together and set it aside for a minute. Now you need to heat a large skillet over medium heat and cover the bottom in olive oil. In a shallow dish, put about 3/4 cup of panko bread crumbs.
Are you ready for tip for avoiding mess number two? Ok good, it's coming up! Once the pan/oil are hot, get your hands wet, and make a ball and then flatten it into a patty in your wet hands. Press the patty into the bread crumbs, and CAREFULLY flip it over and get the other side. Once they are both coated, place it into the hot pan, and if it got all screwy, you can reform it a bit with a spatula. Repeat three more times and then let them cook a few minutes on each side.
I served my "burger" on a toasted wheat bun with a little romaine lettuce, sliced avocado, and a little mix of brown mustard and mayo. I also baked off some onion rings and made a little creamed spinach with red pepper flakes.
Before I even start, this got messy. I have very few pictures of the process because I was a mess. There was sweet potato everywhere, I used half the tools in my kitchen, and definitely got to a point where I was asking, "What have I gotten myself into?!" But I learned a lot tonight, and I will pass along my new found wisdom, which should keep your kitchen, hands, and life a little neater, at least for this meal.
So, first you need to cook a sweet potato. I did this by piercing the skin and roasting it at 375 for like 25 minutes. Next time I will poke it and microwave it for sure. Next, you need to drain and rinse a can of white beans. Now, my first mistake was thinking, I should totally use my mini food processor! (Mostly because I thought it would be faster, but also because it's my newest kitchen toy and I wanted to use it) but I will tell you that it wasn't going to give me the texture I wanted, so halfway through the processing, I took it out, transferred it to a bowl, and mashed it with my potato masher. (Mess #1) So, take my advice, and just use a bowl and a masher.
Once the sweet potato is cooked, you can put your beans and the potato (not the skin) into a bowl, add an egg, about 4 tbsp of wheat flour, salt, pepper, and I used cajun seasoning. I wish I had used more salt and more seasoning. I think you could use whatever seasoning you like, I thought about lemon pepper, but thought the little spice and heat would balance the sweetness of the sweet potato. (It did!) Ok, so mash all of that together and set it aside for a minute. Now you need to heat a large skillet over medium heat and cover the bottom in olive oil. In a shallow dish, put about 3/4 cup of panko bread crumbs.
Are you ready for tip for avoiding mess number two? Ok good, it's coming up! Once the pan/oil are hot, get your hands wet, and make a ball and then flatten it into a patty in your wet hands. Press the patty into the bread crumbs, and CAREFULLY flip it over and get the other side. Once they are both coated, place it into the hot pan, and if it got all screwy, you can reform it a bit with a spatula. Repeat three more times and then let them cook a few minutes on each side.
I served my "burger" on a toasted wheat bun with a little romaine lettuce, sliced avocado, and a little mix of brown mustard and mayo. I also baked off some onion rings and made a little creamed spinach with red pepper flakes.
This burger is crunchy on the outside, creamy on the inside, and the only burger I have ever had that didn't need cheese. Although, I did buy some goat cheese that I may try on one of the leftovers. Please do yourself a favor and make these. They are perfectly delicious.
Wednesday, December 26, 2012
Hamburger Noodle Bake
I have been hosting my parents for Christmas dinner for the past few years, and until this year I made a big turkey dinner. Now, this year I thought that I would change it up a little bit. One of my favorite meals from my "other life" was one that my former MIL would make, Hamburger Noodle Bake. It is very similar to lasagna, but I think, more delicious. My parents both loved it, and it certainly freed up my day, so I could enjoy it with my family instead of slaving away in the kitchen all afternoon! Also, I put it together earlier in the day, set it aside, and then just baked it off at dinner time.
So here's the deal. You will need:
1 lb ground beef
1 clove of garlic, minced
1 tsp sugar
2 15 oz. cans of tomato sauce
8 oz. extra wide egg noodles
1 med. onion, chopped
1 package cream cheese
1 c. ricotta
1/4 c. sour cream
1/2 c. cheddar cheese, shredded
salt and pepper
Pre heat your oven to 350 degrees and start by browning your meat in a large saute pan over medium heat. I used a 93/7 so I started with a touch of olive oil in the pan since it was so low in fat. Season with salt and pepper, and once the meat is brown, drain off any fat and add the sugar, garlic, and tomato sauce. Bring this to a simmer, cover, and leave it for 25 minutes.
Next start a large pot of water boiling, add a bunch of salt, and once it's rolling, add your noodles. It's about 2/3s of a regular package. While they are all cooking away, you can mix your other ingredients together. Soften the cream cheese so it mixes, and add the ricotta, sour cream, and onions. Make sure it's a pretty big mixing bowl because you need room to add the noodles as well.
Once the noodles are cooked al dente, drain them, and add them right away to the cream cheese mixture. Stir it all together and put half of it in the bottom of a 2 qt. casserole dish.
Ok, now, once your sauce is finished cooking, you can add half of it on top of the layer of noodles. Next add the rest of the noodles, and the rest of the sauce on top. Lastly, you can sprinkle your cheese right on top, and put it in the oven.
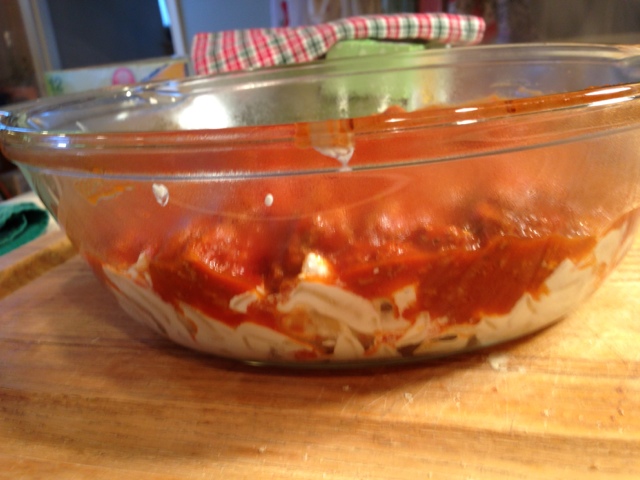
Sorry that we were so excited to dig into dinner that I forgot to take a picture of it all hot and bubbly out of the oven, but here is what it looked like once we had devoured it! It was totally delicious last night, and again today for lunch. Pair it with a green salad and some yummy bread and you have a killer, easy dinner. Enjoy!
So here's the deal. You will need:
1 lb ground beef
1 clove of garlic, minced
1 tsp sugar
2 15 oz. cans of tomato sauce
8 oz. extra wide egg noodles
1 med. onion, chopped
1 package cream cheese
1 c. ricotta
1/4 c. sour cream
1/2 c. cheddar cheese, shredded
salt and pepper
Pre heat your oven to 350 degrees and start by browning your meat in a large saute pan over medium heat. I used a 93/7 so I started with a touch of olive oil in the pan since it was so low in fat. Season with salt and pepper, and once the meat is brown, drain off any fat and add the sugar, garlic, and tomato sauce. Bring this to a simmer, cover, and leave it for 25 minutes. Next start a large pot of water boiling, add a bunch of salt, and once it's rolling, add your noodles. It's about 2/3s of a regular package. While they are all cooking away, you can mix your other ingredients together. Soften the cream cheese so it mixes, and add the ricotta, sour cream, and onions. Make sure it's a pretty big mixing bowl because you need room to add the noodles as well.
Once the noodles are cooked al dente, drain them, and add them right away to the cream cheese mixture. Stir it all together and put half of it in the bottom of a 2 qt. casserole dish. Sorry that we were so excited to dig into dinner that I forgot to take a picture of it all hot and bubbly out of the oven, but here is what it looked like once we had devoured it! It was totally delicious last night, and again today for lunch. Pair it with a green salad and some yummy bread and you have a killer, easy dinner. Enjoy!
Friday, November 30, 2012
Date Night Dinner
It's Friday night; date night! Well, for me it's usually first a date with Wegmans, and then with my DVR, but that's the quiet life of a single lady. Anyway, just because I don't have someone to cook for doesn't mean I don't enjoy a delicious dinner, and this certainly is one of my favorites. Although I have never cooked this for a date with another person, I am fairly certain it would go over very well. I would date me if I made this... Anyway, here we go.
This meal includes many foods that I have only as an adult discovered to be delicious (risotto, mushrooms, and brussel sprouts.) If you aren't a fan, leave out the fungus, and sub in your favorite vegetables for the sprouts. If you don't eat steak, I do something similar with chicken. I will try to remember to blog about it soon!
So the meal is pan cooked, grass-fed beef tenderloin (a Wegmans favorite of mine), mushroom risotto, mushrooms in red wine sauce, and roasted brussel sprouts. It is SO GOOD and pretty easy to make, you just can't walk away. Never walk away from risotto!
First, take out your steak to rest and pre-heat your oven to 425 degrees (I used my toaster oven and it worked just fine!) Start by dicing a small onion, and add it to 1 Tbsp. olive oil, 1 Tbsp. of butter in a medium sauce pan over medium heat. Let them soften up while you prep some other ingredients. Heat a saute pan over medium heat and add a little butter with a few turns around the pan of olive oil, then throw in your mushrooms. I used a package of slice baby bellas, but buttons would work too. Let them brown up before you season because the salt will draw the water out and they won't get the yummy brown color.
Now you can add the Arborio rice to your onions and let them brown up a bit. While that's all going, take a small sauce pan and heat your 1.5 cups of chicken stock over medium low heat. This is what you will add to your rice.
Now get your sprouts groovin' by rough chopping 4 cloves of garlic, and then toss your halved and quartered brussel sprouts (I just eye-balled a serving, and Wegmans sells them this time of year all ready clean and cut, so that was awesome! I used about half of that package) with olive oil, salt and pepper. I just threw it all in a tupperware container and tossed them around to coat, then laid it all out in a single layer on my foil lined baking sheet and put them in the oven. my friend, Holland taught me this way, so thanks, Holland!
Once that's in the oven, leave it be, and get back to the stove. It's time to add about a third of the hot chicken stock to the rice and stir, stir, stir. The stirring is what makes the rice creamy, so whenever you think of it, give it a few turns around the pan. Your mushrooms are probably ready for salt and pepper, and a good stirring, also. Once they are nice and brown, move them to the sides of the pan, turn up the heat, put down a little bit more olive oil, and add your steaks. Make sure they have been salt and peppered on both sides, and are room temperature. Let it sear on one side, then give them a flip, add about a third of a cup of good red wine, and let it simmer.
Once the stock has been absorbed by the rice, add another third of the stock, and stir some more. Once that's been absorbed, add in half of the mushrooms, and the last of the stock, stirring some more. Also, add some pepper, but no salt because the stock has plenty.
When your steak is done (probably about 3 minutes on each side for medium rare) remove it from the pan and let it rest before you cut it. When your risotto is creamy and when you taste a little it still has a tiny bite to it, but isn't crunchy or mush, take it off the heat, add a tsp. of good butter and a quarter cup of freshly grated Parmesan cheese. You can probably take the sprouts out now and check if they are tender. If so, leave them out, if not, give them a few more minutes.
OH! I almost forgot one of my favorite parts. Now, this is absolutely not necessary, but since I had some tasty garlicky Italian bread left over from the other night, I made something my friends and I call "meat bread." It was born at one of those restaurants where you cook your own meat, and we always throw our buttered bread down on the grill after all the meat has been cooking, and vala! Meat bread was born. So, for this meal, after I take the steak off, I put my mushrooms and what's left of the reduced wine and transfer them into my now empty chicken stock pan until I'm ready with them, add a little butted to the meat pan, and toast off some good bread on both sides.
It is so good, but if you don't have bread around, trust me, it's just a bonus, you won't need it. Now you just have to plate it all up, pour some wine and enjoy! Whether you have a date with the person of your dreams, or your DVR, you will love this meal.
Monday, November 5, 2012
Chicken Divan
This is another recipe I pulled out from my "other life." My former MIL used to make this one all the time and it was one of my favorites. I made a few weeks ago and it was as good as I remembered! I only changed a few little things, and I think I would change one more next time, so I'll share those with you as well. Here is the original recipe:
1/4 cup butter
6 Tbs flour
1/2 tsp salt
2 cup chicken broth
3/4 cup milk or cream
2 Tbs dry sherry or white wine or curry
3 chicken breasts (both sides)
American cheese, grated or slices
1/4 cup grated parmesan
Cook broccoli. Melt butter; blend in other dry ingredients with pepper. Add broth. Cook and stir until sauce thickens and bubbles. Stir in wine and milk. Place broccoli in dish. Add half of the sauce. Top with cooked chicken. Cover with slices of American cheese or shredded cheese. Pour remaining sauce over the cheese. Sprinkle with parmesan. Bake at 350 degrees for 35 minutes.
So, my changes are: I used fresh broccoli instead of frozen (3 heads) and I cooked it for just a few minutes before putting it in the dish. Next time I won't cook it first, I don't think it is necessary. The other time saving change I made was not pre-cooking the chicken. It cooked through just fine in the over, no worries and a big time saver if you don't have a bunch of cooked chicken hanging around. Below are some photos of the process and final product. I used the curry powder, but I'm sure the wine would be delicious and light!
![]() |
| Add the broccoli |
![]() |
| Make a rue and add the seasonings |
![]() |
| Add the milk, I used 1%, and let it thicken up |
![]() |
| After! |
![]() | |||||
| Assembled: Before cooking |
![]() |
| Serve over extra wide egg noodles, and enjoy! |
Subscribe to:
Posts (Atom)